第六章 Centos 7 Linux配置web 实训任务:Apache服务器部署
发表于:2024-05-28 | 分类: 服务器技术与应用
字数统计: 1.5k | 阅读时长: 7分钟 | 阅读量:

前言

==前面的DNS一定要成功才能做!!!==
虚拟机需求:1台DNS服务器(Server)、1台Web服务器(Web Server)、1台客户端(Client1)

在第五章的基础上继续实训

Apache服务器部署

任务情境描述

某公司需要搭建一台Web服务器,用于公司办公和网站宣传;还有另一台DNS服务器,用于实现Web服务器的域名解析。

网络拓扑图如下:

部署信息如下:

• Server1为DNS服务器,IP地址为:192.168.1.10;

• Server2为Web服务器,IP地址为:192.168.1.100。

实训任务:

任务1

搭建http://web1.mydomain.com的web1服务器,主目录是/var/www/web1,只允许192.168.1.0/24网段的主机访问。

任务2

搭建基于8008端口号的安全服务器,可使用https://web2.mydomain.com:8008地址访问,主目录是/var/www/web2,使用CA颁发证书进行安全认证。
“CSK Global Root CA”颁发机构颁发,网站证书信息如下:
C = CN
ST = China
L = GuangZhou
O = mydomain.com
OU = Operations Departments
CN = web2.mydomain.com

任务3 启动防火墙,SELinux设置为(Enforcing)。

一、配置Web服务器(Web Server)的IP地址

1
2
3
4
5
6
BOOTPROTO=static
IPADDR=192.168.1.100
GATEWAY=192.168.1.2
NETMASK=255.255.255.0
DNS1=192.168.1.10
DNS2=202.96.128.86

二、在Web服务器(Web Server)上生成CA证书

1
2
3
4
5
6
7
8
9
10
11
12
13
14
15
16
17
18
19
20
21
22
23
24
25
26
27
28
29
30
31
32
[root@webserver webserver]# cd /etc/pki/tls/certs/
[root@webserver certs]# make server.key

[root@webserver certs]# openssl rsa -in server.key -out server.key

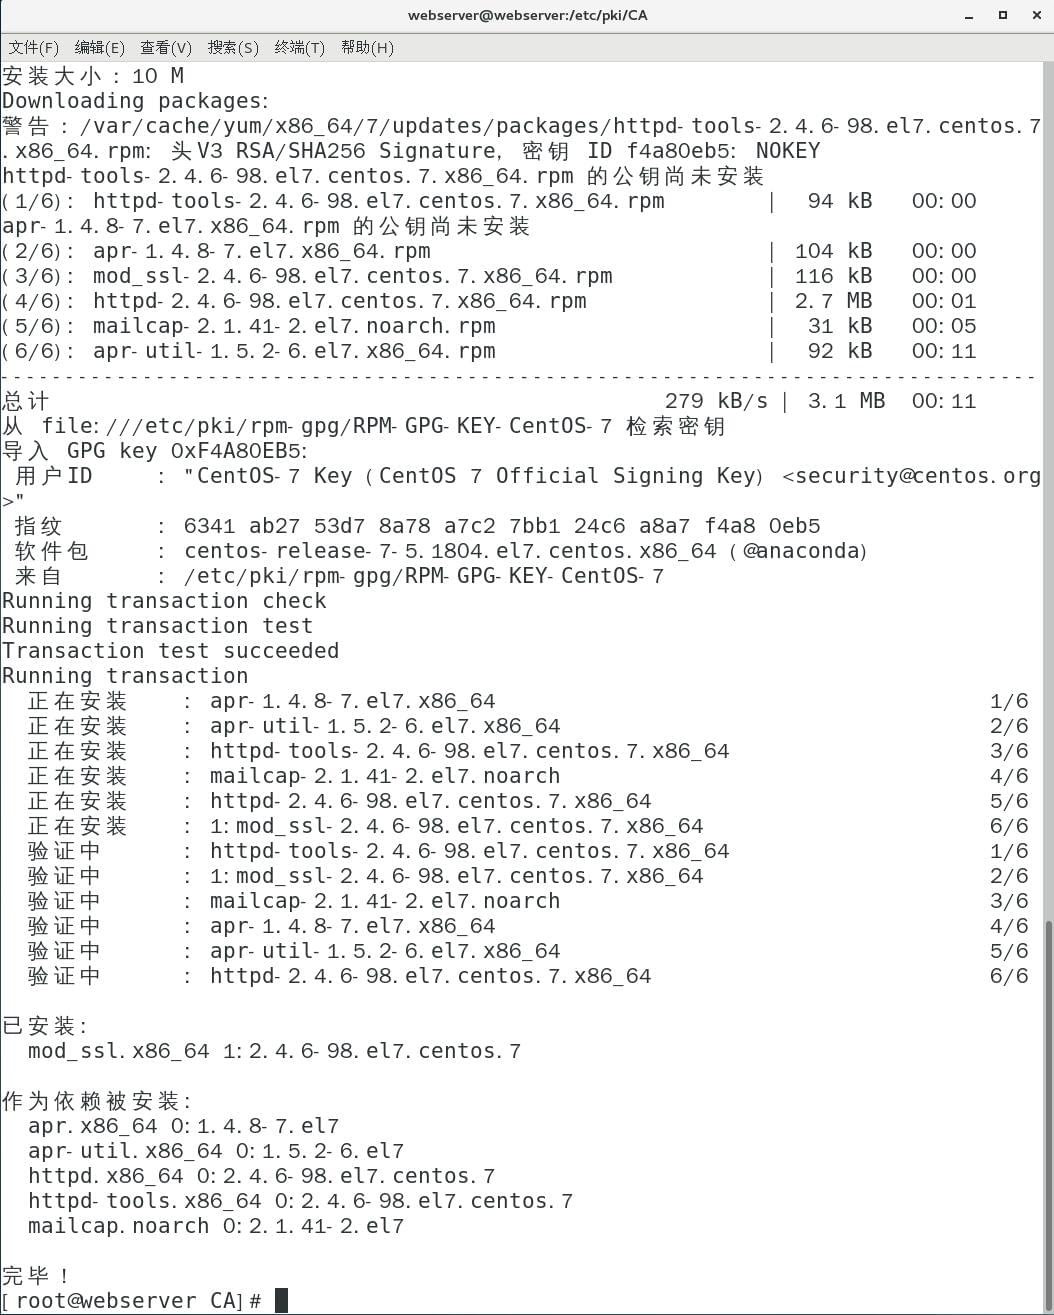
[root@webserver certs]# make server.csr
umask 77 ; \
/usr/bin/openssl req -utf8 -new -key server.key -out server.csr
You are about to be asked to enter information that will be incorporated
into your certificate request.
What you are about to enter is what is called a Distinguished Name or a DN.
There are quite a few fields but you can leave some blank
For some fields there will be a default value,
If you enter '.', the field will be left blank.
-----
Country Name (2 letter code) [XX]:CN
State or Province Name (full name) []:China
Locality Name (eg, city) [Default City]:GuangZhou
Organization Name (eg, company) [Default Company Ltd]:ymx.com
Organizational Unit Name (eg, section) []:Operations Deoartments
Common Name (eg, your name or your server's hostname) []:web2.ymx.com
Email Address []:
Please enter the following 'extra' attributes
to be sent with your certificate request
A challenge password []:
An optional company name []:
[root@webserver certs]# openssl x509 -in server.csr -out server.pem -req -signkey server.key -days 365

[root@webserver certs]# chmod 400 server.*
[root@webserver certs]# yum -y install httpd mod_ssl
[root@webserver certs]# systemctl restart httpd

1. 修改OpenSSL配置文件

1
vim /etc/pki/tls/openssl.cnf	//打开OpenSSL配置文件修改以下
1
2
3
my-ca.crt
my-ca.crl
my-ca.key

1
2
3
4
5
6
7
8
9
10
11
12
13
14
15
16
17
18
19
20
21
22
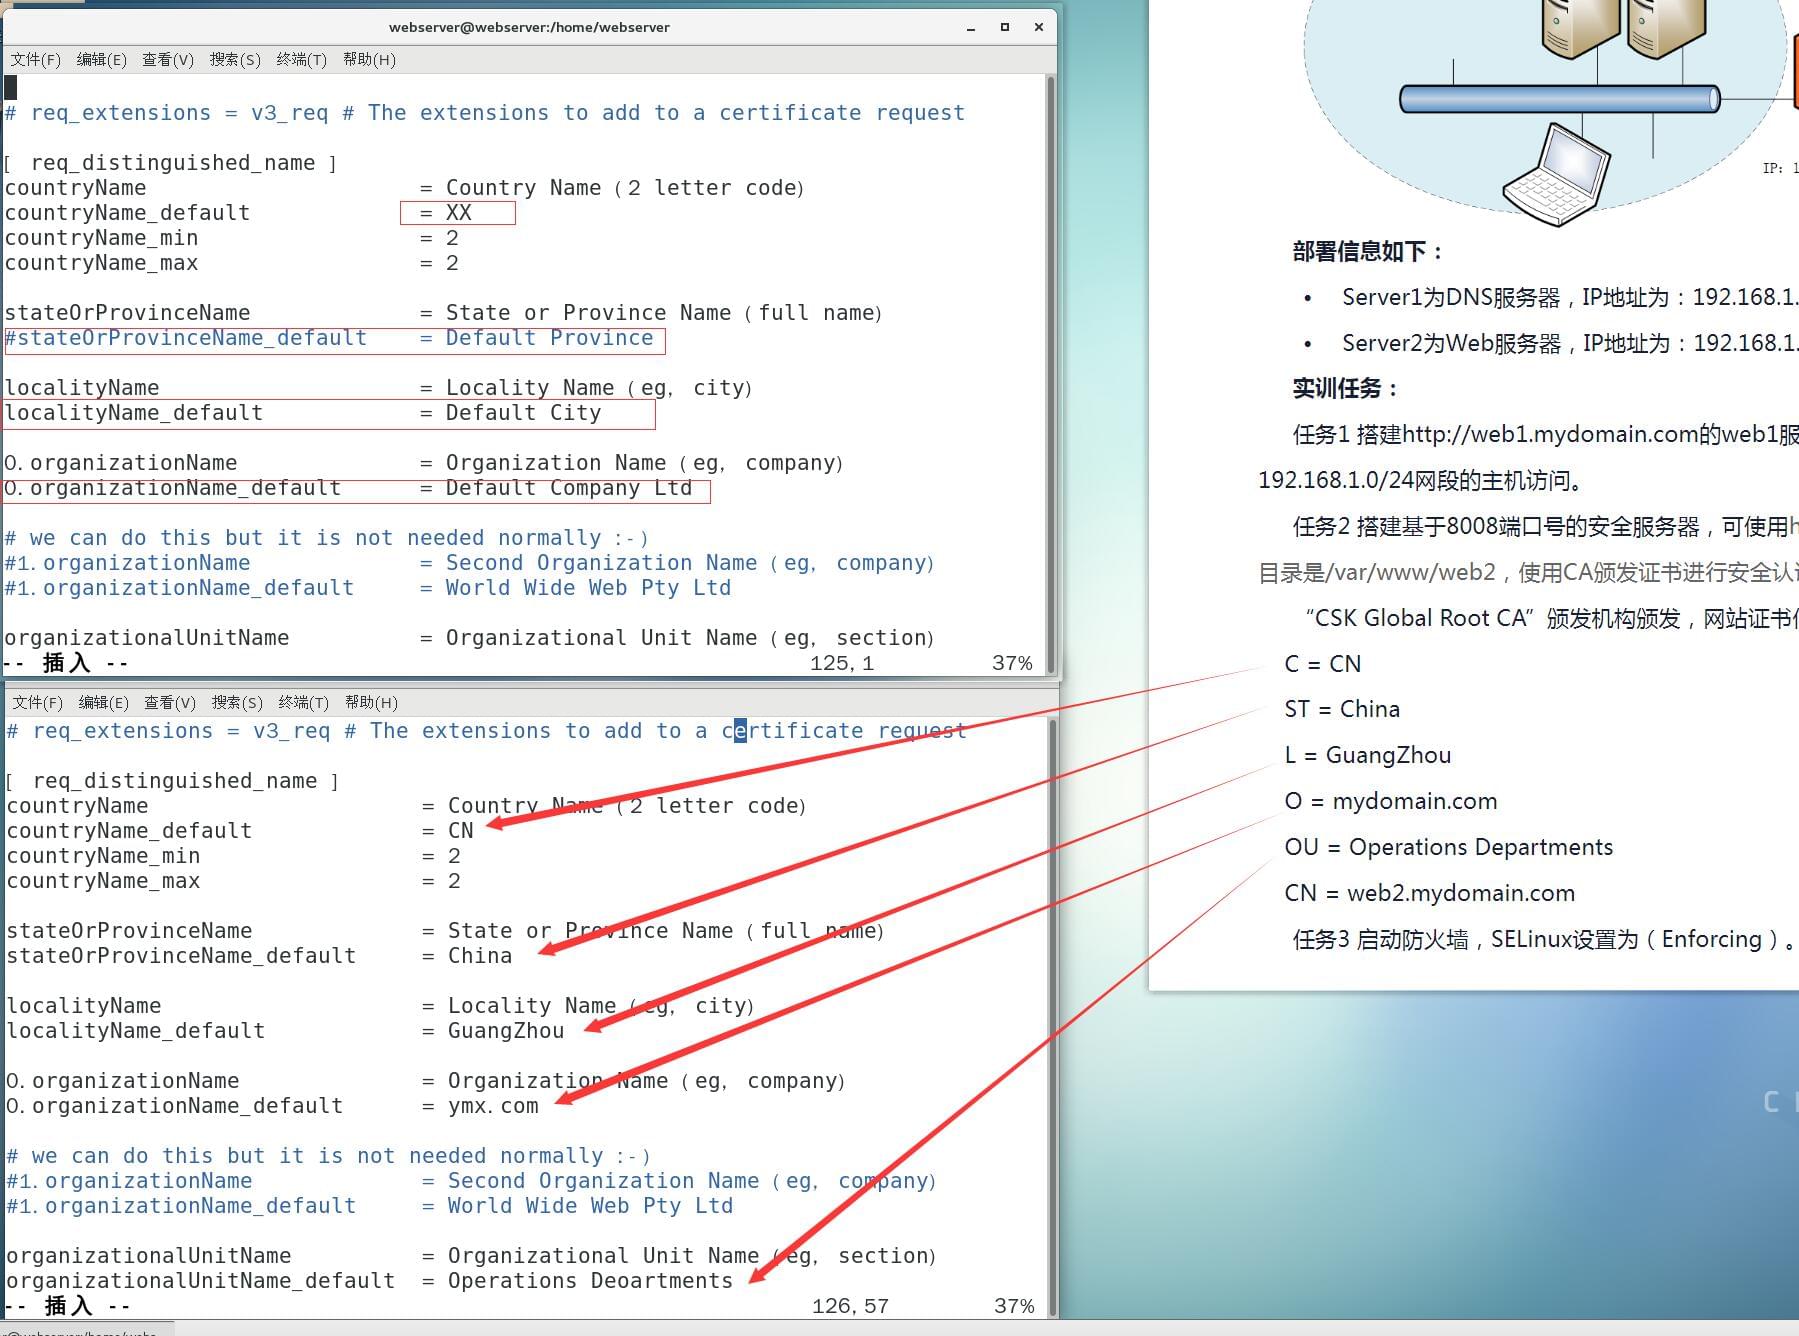
[ req_distinguished_name ]
countryName = Country Name (2 letter code)
countryName_default = CN
countryName_min = 2
countryName_max = 2

stateOrProvinceName = State or Province Name (full name)
stateOrProvinceName_default = China

localityName = Locality Name (eg, city)
localityName_default = GuangZhou

0.organizationName = Organization Name (eg, company)
0.organizationName_default = ymx.com

# we can do this but it is not needed normally :-)
#1.organizationName = Second Organization Name (eg, company)
#1.organizationName_default = World Wide Web Pty Ltd

organizationalUnitName = Organizational Unit Name (eg, section)
organizationalUnitName_default = Operations Deoartments

2

1
2
3
保存退出 :wq
cd /etc/pki/CA/ //进入CA目录
ls //查看目录

2. 生成CA文件

1
2
3
touch /etc/pki/CA/index.txt							//新建一个放数据的文件
echo 01 > /etc/pki/CA/serial //创建一个索引文件
openssl genrsa -out private/my-ca.key -des3 2048 //生成CA文件,输入两次密码(请记住)

3. 生成公钥文件

1
openssl req -new -x509 -key private/my-ca.key -days 365 > my-ca.crt	//生成公钥文件

4. 创建Server.key

1
2
3
4
openssl genrsa -des3 -out server.key 2048	//创建server.key
ls //查看目录
openssl rsa -noout -text -in server.key //不输出以text文本查看server.key,输入保护密钥
cat server.key //查看

1
2
3
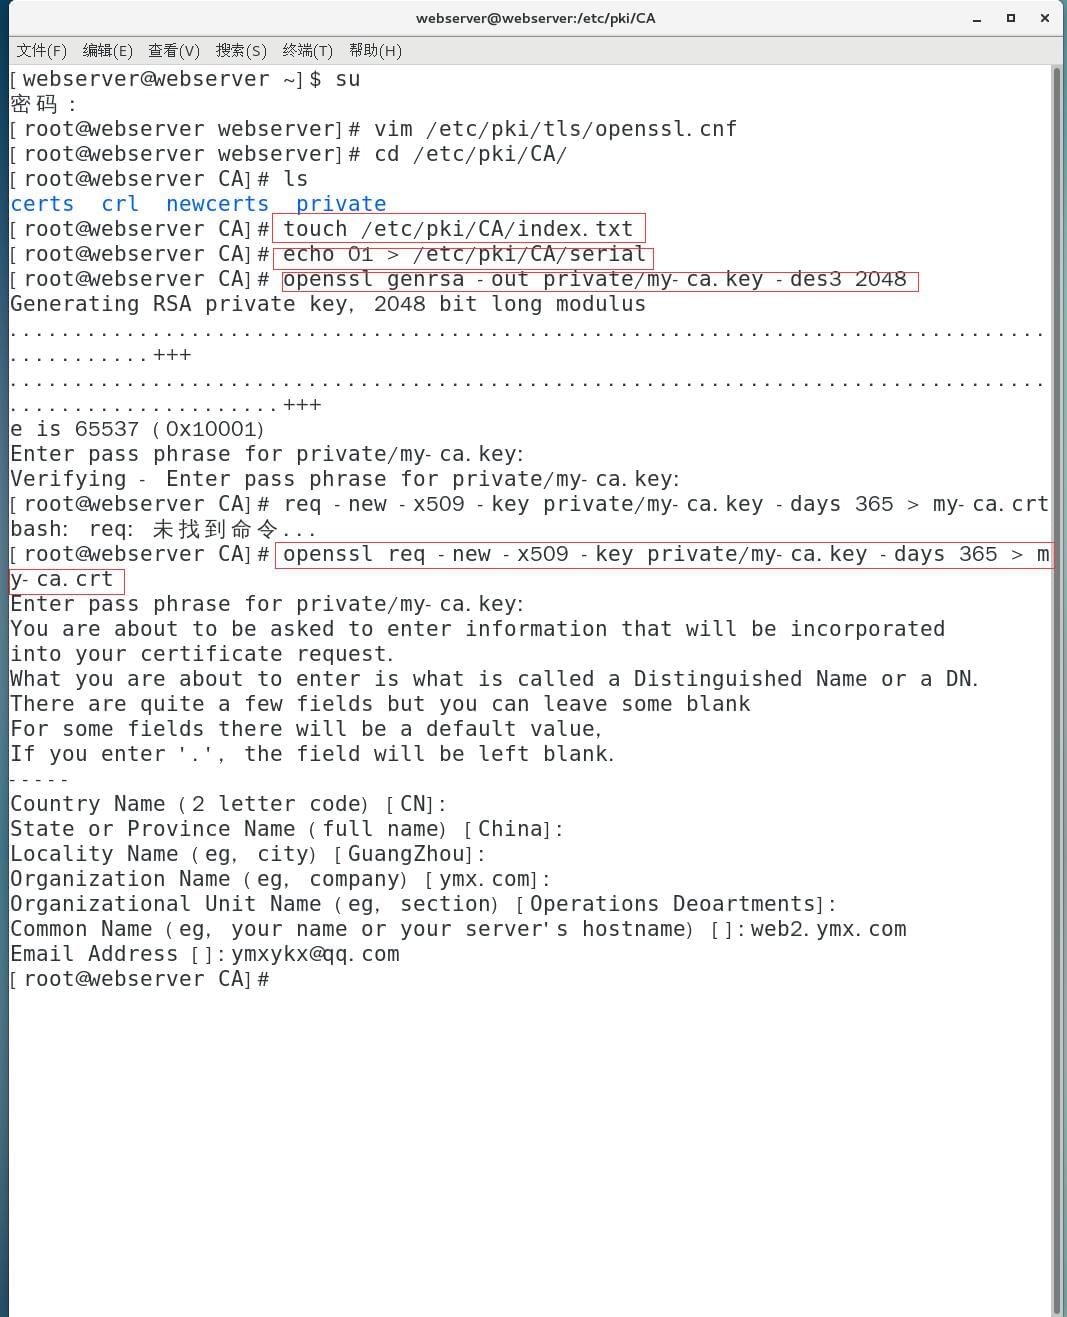
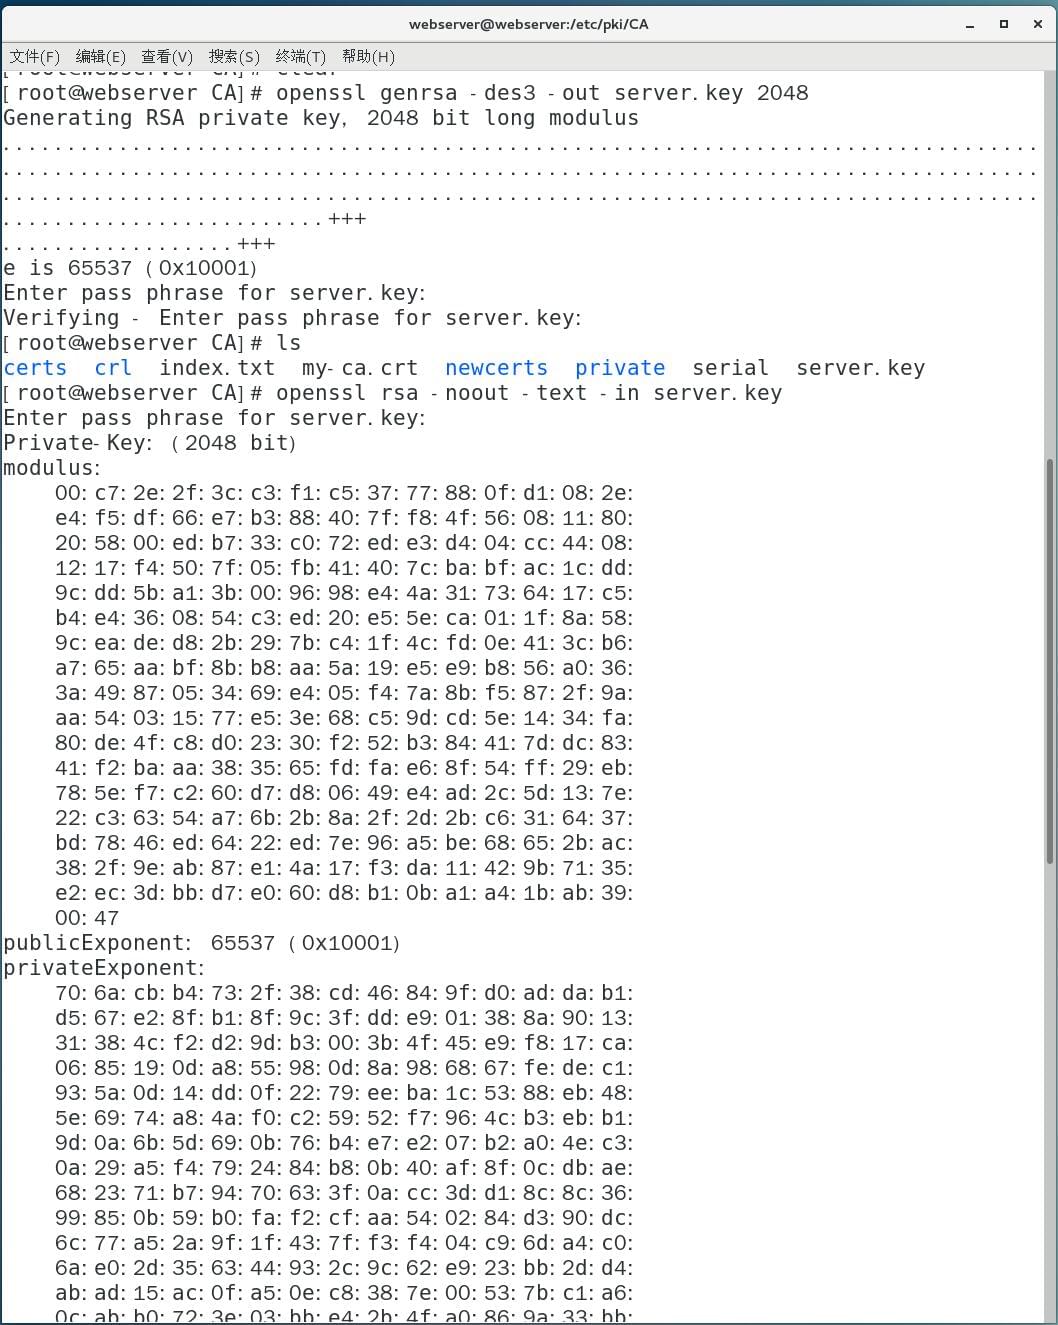
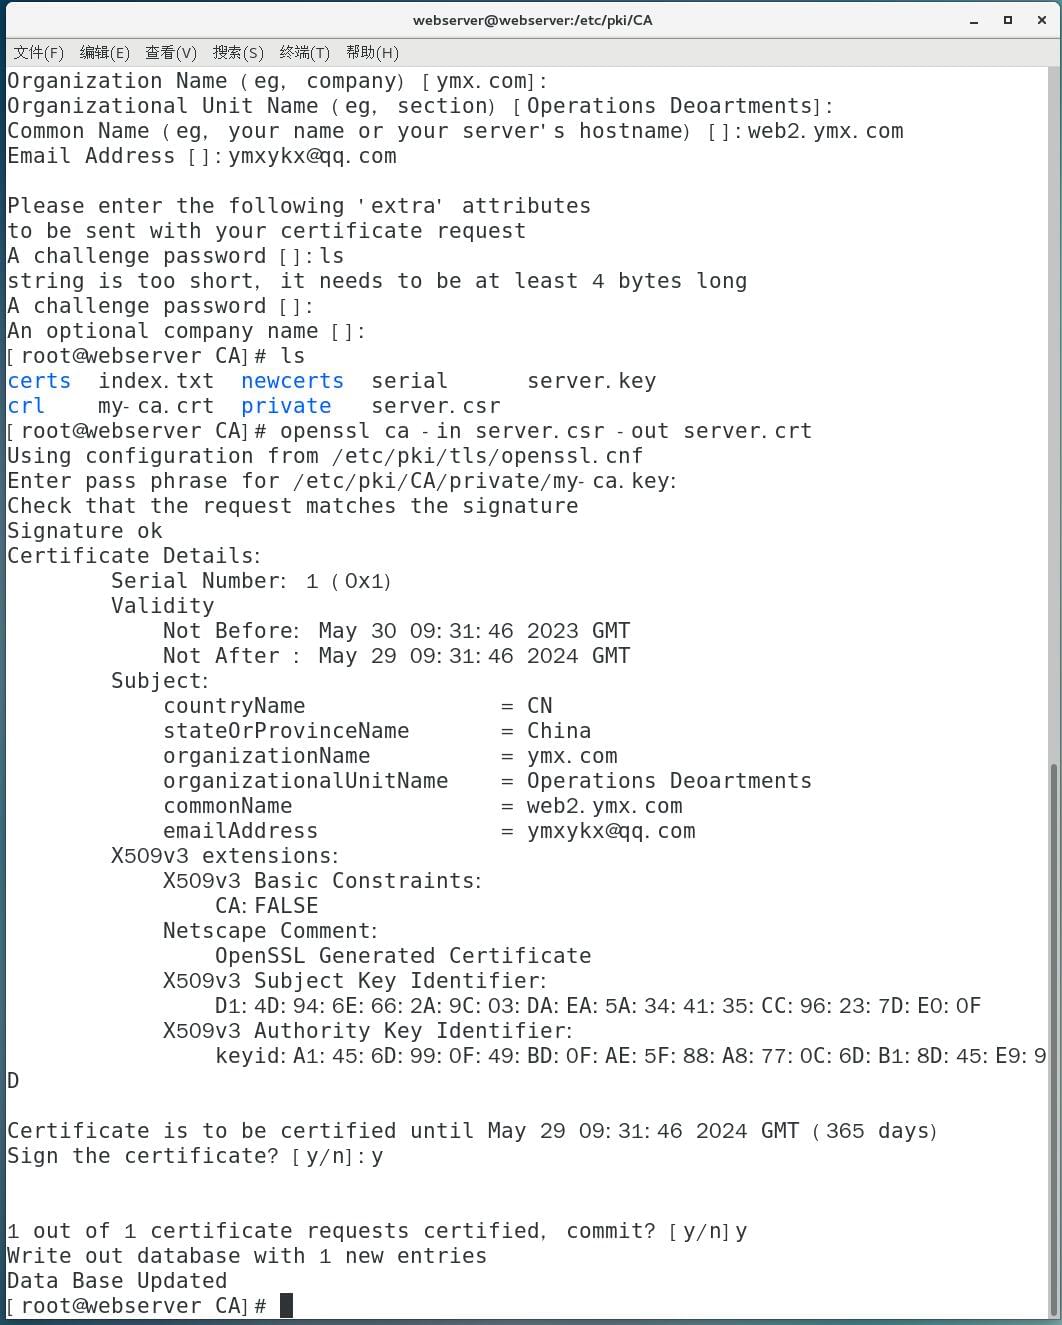
openssl req -new -key server.key -out server.csr	//证书申请
ls //查看目录
openssl ca -in server.csr -out server.crt //生成公钥文件,输入密码,两次确认

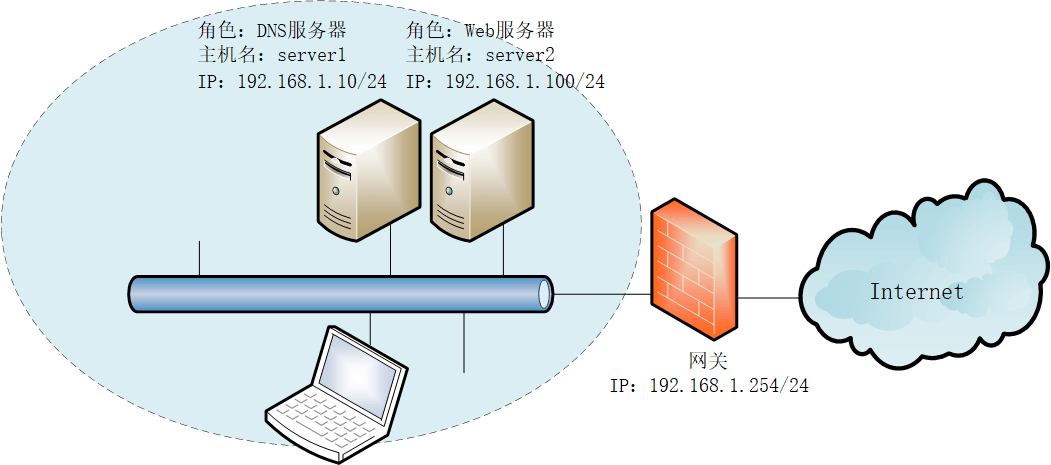
三、在DNS服务器(Server)上添加记录

1. 添加正向区域记录

1
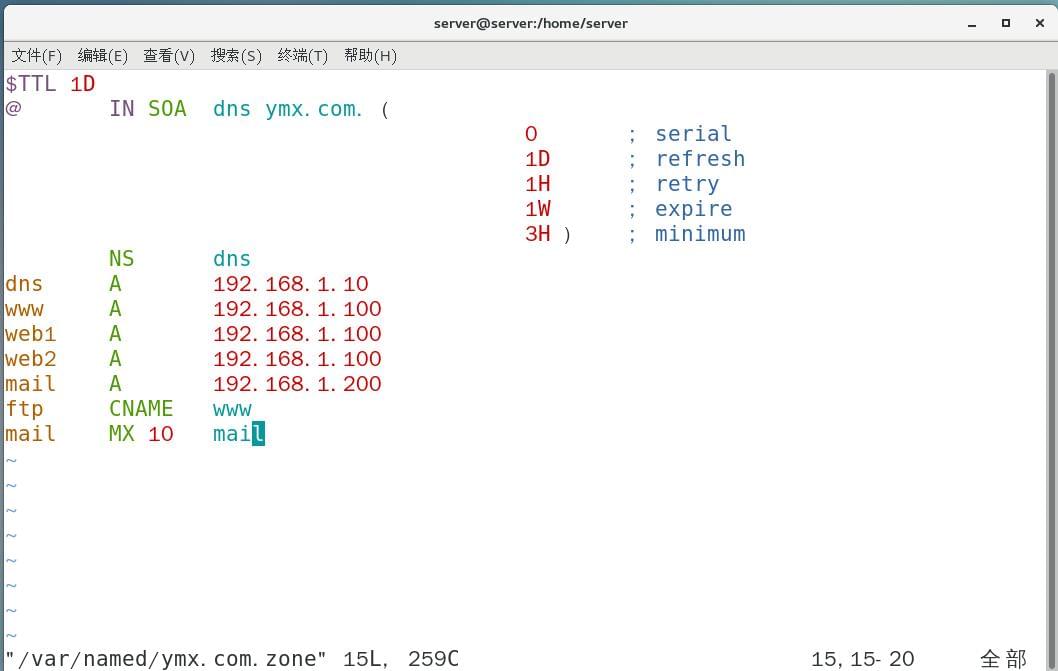
vim /var/named/ymx.com.zone		//打开正向区域文件
1
2
3
4
5
6
7
8
9
10
11
12
13
14
15
16
$TTL 1D
@ IN SOA dns ymx.com. (
0 ; serial
1D ; refresh
1H ; retry
1W ; expire
3H ) ; minimum
NS dns
dns A 192.168.1.10
www A 192.168.1.100
web1 A 192.168.1.100 //添加这两条
web2 A 192.168.1.100
mail A 192.168.1.200
ftp CNAME www
mail MX 10 mail

2. 添加反向区域记录

1
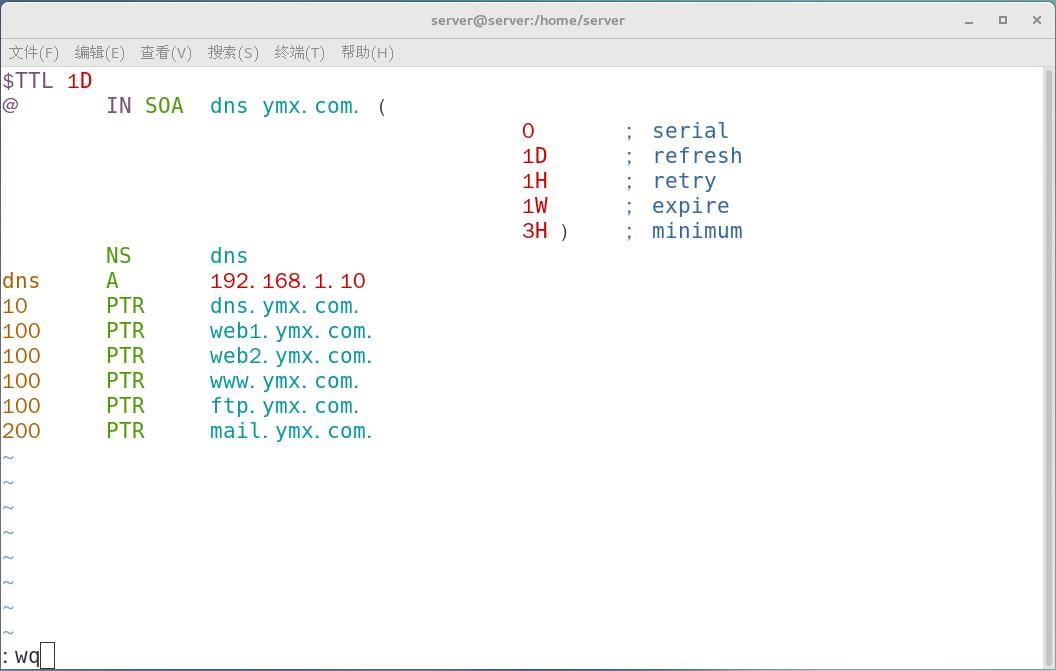
vim /var/named/1.168.192.zone	//打开反向区域配置文件
1
2
3
4
5
6
7
8
9
10
11
12
13
14
15
$TTL 1D
@ IN SOA dns ymx.com. (
0 ; serial
1D ; refresh
1H ; retry
1W ; expire
3H ) ; minimum
NS dns
dns A 192.168.1.10
10 PTR dns.ymx.com.
100 PTR web1.ymx.com. //添加这两条
100 PTR web2.ymx.com.
100 PTR www.ymx.com.
100 PTR ftp.ymx.com.
200 PTR mail.ymx.com.

1
systemctl restart named			//重启dns服务

四、在Web服务器(Web Server)上安装httpd和mod_ssl服务

1
yum -y install http mod_ssl		//安装

1.修改ssl配置文件

1
vim /etc/httpd/conf.d/ssl.conf	//修改配置文件
1
2
3
4
5
6
7
8
Listen 8008 https									//监听8008端口
<VirtualHost *:8008> //虚拟主机头
ServerName web2.ymx.com:8008 //服务器名
DocumentRoot "/var/www/web2" //目录
SSLCertificateFile /etc/pki/CA/server.crt //ca证书文件
SSLCertificateKeyFile /etc/pki/CA/server.key //ca公钥文件
SSLCACertificateFile /etc/pki/CA/server.crt //ca私钥文件
</VirtualHost>

2. 新建网页

1
2
3
4
5
[root@webserver CA]# mkdir /var/www/web1
[root@webserver CA]# mkdir /var/www/web2
[root@webserver CA]# vim /var/www/html/index.html
[root@webserver CA]# vim /var/www/web1/index.html
[root@webserver CA]# vim /var/www/web2/index.html

3. 新建虚拟主机

1
vim /etc/httpd/conf.d/vhost.conf
1
2
3
4
5
6
7
8
9
10
11
12
13
14
15
16
<VirtualHost www.ymx.com>
ServerName www.ymx.com
DocumentRoot "/var/www/html"
</VirtualHost>

<VirtualHost web1.ymx.com>
ServerName web1.ymx.com
DocumentRoot "/var/www/web1"
</VirtualHost>

<Directory '/var/www/web1'>
Options Indexes FollowSymLinks
AllowOverride None
Order allow,deny
allow from 192.168.1.0/24 //只允许192.168.1.0/24 通过
</Directory>

1
2
3
4
5
6
[root@webserver webserver]# systemctl restart httpd					//重启http服务
Enter SSL pass phrase for web2.ymx.com:8008 (RSA) : **** //输入密码
[root@webserver webserver]# systemctl enable httpd //开机自启
Created symlink from /etc/systemd/system/multi-user.target.wants/httpd.service to /usr/lib/systemd/system/httpd.service.
[root@webserver webserver]#

5. 修改httpd.conf配置文件

1
2
[root@webserver CA]# vim /etc/httpd/conf/httpd.conf 
ServerName www.ymx.com:80

6. 防火墙设置

1
2
3
4
5
6
7
8
9
10
11
12
13
[root@webserver CA]# firewall-cmd --permanent --zone=public --add-service=http	//开启http
success
[root@webserver CA]# firewall-cmd --permanent --zone=public --add-service=https //开启https
success
[root@webserver CA]# firewall-cmd --permanent --zone=public --add-port=8008/tcp //开启8008端口
success
[root@webserver CA]# firewall-cmd --permanent --zone=public --add-port=8008/udp
success
[root@webserver CA]# firewall-cmd --reload //重启防火墙
success
[root@webserver CA]# netstat -an | grep :8008 //查看端口
tcp6 0 0 :::8008 :::* LISTEN

7. 复制证书文件

1
2
[root@webserver CA]# cd /etc/pki/CA
[root@webserver CA]# cp my-ca.crt /var/www/web1/

8. 客户端(Client 1)导入CA证书

打开浏览器输入地址http://web1.ymx.com/my-ca.crt 下载证书文件并导入证书

9. 最终效果

http://web1.ymx.com
https://web2.ymx.com:8008

至此,实验结束

上一篇:
第七章 Centos 7 Linux配置ftp 实训任务1:FTP服务器加密传输
下一篇:
第五章 Centos 7 Linux配置dns 实训任务:部署DNS服务器